

Concrete repair methods cover many different techniques used to bring back the strength, function, and appearance of concrete surfaces. Options range from high-pressure epoxy injections for structural cracks to lifting methods like polyjacking and mudjacking for sunken slabs. The right choice depends on whether the problem is cosmetic or structural, whether cracks are still moving, and the climate and site conditions.
For property owners in dense cities (e.g. concrete repair in New York), working with specialized services is often necessary to deal with issues such as structural eyebrow failure or heavy wear from constant foot and vehicle traffic.
Learning about these methods helps stop small flaws from turning into serious structural problems. Whether it is a hairline crack in a driveway or damage in a dam spillway, the aim is to create a strong repair that can handle weather, chemicals, and heavy loads. Ignoring needed repairs can lead to hydraulic failures or unsafe conditions, so taking care of problems early saves money and reduces risk.
Choosing the Best Concrete Repair Method
Factors to Consider Before Repairing Concrete
Before any repair starts, you must find the true cause of the damage. Many problems come from poor practices during the original pour, like wrong water-to-cement ratios, or from outside forces such as flowing water, ice, or heavy traffic.
If you do not fix underlying issues-like weak soil, poor compaction, or bad drainage-any repair is likely to fail as the concrete keeps moving or eroding underneath.
Engineers also study the conditions where the concrete is placed. Concrete in wet locations or in areas with many freeze-thaw cycles needs materials with specific air content and low permeability. You also need to decide if the damage is “major” (affecting use and safety) or “minor” (mainly cosmetic).
Major structural issues often show up as wide cracking, settlement, or joints that have shifted. These signs usually call for a structural engineer to check the situation and keep the building safe.
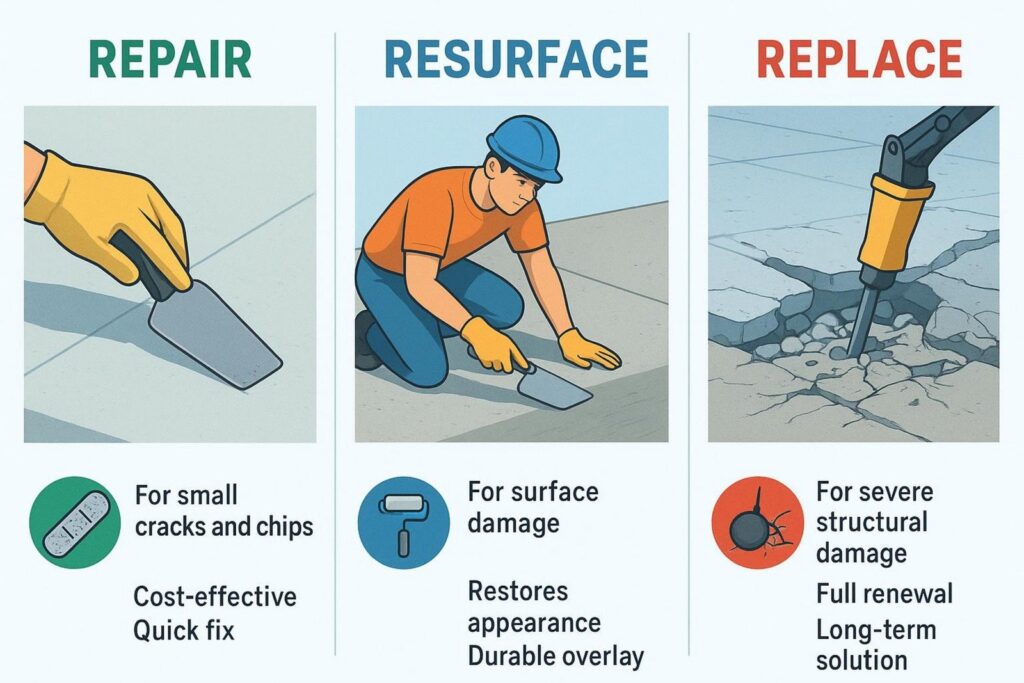
When to Repair, Resurface, or Replace Concrete
Choosing between a simple repair and complete replacement depends on how deep and wide the damage is. In general, if the damaged area is deeper than about six inches or runs through the full thickness of the slab, full-depth replacement is usually recommended. If the slab is still sound but looks worn, pitted, or lightly scaled, a thin resurfacing layer can give it a fresh surface at far less cost than replacing the slab.
Replacement is often best when concrete has reached the end of its useful life or has broken into many small pieces (roughly under one or two square feet each). For slabs that are just sunken but still in good condition, leveling is usually a better option than replacement.
Leveling can cost up to 70% less than new concrete and avoids noisy demolition and long waiting times for curing. If appearance is critical and the look of ground or patched concrete is not acceptable, replacement may be chosen even though it costs more.
Main Concrete Repair Methods Explained
Crack Injection
Crack injection is a specialized way to bond cracks back together or seal them against water. It works best on narrow cracks that are no longer moving. By filling these gaps with special resins, technicians can make the concrete act like one solid piece again.
This method is often used in structural repairs where the goal is to stop leaks or restore strength. It needs trained installers and special pumps, but it is often the only practical way to fix deep cracks in walls, beams, and foundations without digging out large areas. Due to the technical nature of this process, it is recommended to hire a specialized exterior restoration company like Nova Construction Services, which focuses on the professional repair and restoration of structures using these advanced techniques.
Best Applications for Crack Injection
Injection works well for structural bonding in foundations, bridges, dams, and similar structures. It is mainly used on cracks less than 1/4 inch wide. If the main purpose is to stop water passing through a basement wall or a concrete tank, injection can give a long-lasting, watertight seal that surface patches alone cannot provide.
Materials and Process for Crack Injection
The two most common materials are epoxy and polyurethane. Epoxy is used when strength is needed because it has high tensile capacity. Polyurethane is often used to stop leaks because it expands and fills voids.
For horizontal cracks, gravity feed may be enough, while vertical and overhead cracks usually need low- or high-pressure injection. High-pressure pumps are used for bigger or deeper cracks to push the resin through the full thickness of the concrete.
Patching and Surface Repairs
Patching is the standard fix for small, localized damage like chips, minor holes, or popouts. It involves removing weak or loose concrete and filling the gap with repair mortar. For a patch to last, the edges must be prepared correctly; cutting a straight, square edge with a saw is much better than leaving thin or tapered edges, as it helps lock the new material in place.
The bond between old and new concrete is critical. Pros often use a bond coat-a mix of sand and cement with a thick, creamy texture-right before placing the patch. This helps the two materials work together as one solid unit.
Types of Concrete Patching Products
Common patch materials include:
- Standard portland cement mixes
- Polymer-modified cement-based products
- Fast-setting hydraulic cements
Polymer-modified mixes stick better and have more flexibility, so they are less likely to crack or shrink. Hydraulic cement is useful when time is short, as it can set within minutes, even in wet areas or against running water.
Steps for Durable Patching
- Remove all weak or loose concrete by sawing or chipping down to sound material.
- Clean the area well to remove dust, oil, and debris.
- Pre-wet the surface and leave it in a Saturated Surface Dry (SSD) condition so it does not pull water out of the new patch.
- Apply a bonding agent or bond coat.
- Place and compact the repair material, removing air pockets.
- Moist-cure the patch for the recommended time to limit shrinkage and cracking.
Concrete Resurfacing and Overlay
Resurfacing lets you give a tired concrete surface a fresh look without replacing the whole slab. It means applying a thin layer of new concrete or a polymer overlay over the existing surface. This is common for driveways, patios, and pool decks that are rough or stained but still structurally sound.
Overlays can be plain or decorative. Stamped overlays can imitate brick, stone, or wood, giving a high-end look while using the old slab as a base. This approach covers minor flaws and provides a new wear layer that can handle traffic and weather.
When Resurfacing Is Appropriate
Resurfacing works best for wide areas with surface problems such as scaling, light pitting, or discoloration. It is not a fix for structural movement. If the slab is settling or has large active cracks, these issues will soon show through the new layer. Resurfacing should only be done on solid, stable slabs that have been cleaned and prepared correctly.
Benefits of Concrete Overlays
Main benefits include:
- Improved appearance at a lower cost than full replacement
- Extra protection against moisture and freeze-thaw damage
- Very thin application (often around 1/4 inch) with high strength and reliable color when polymer-modified
Grinding, Leveling, and Raising Sunken Concrete
Uneven slabs create trip hazards and drainage issues. Grinding is often used as a last option to smooth raised joints by shaving down the higher side. It is quick and inexpensive, but it makes the slab thinner and more likely to crack or break in freezing conditions.
Leveling focuses on the empty space under the slab. By pumping material beneath the concrete, technicians can lift it back into position. This keeps the full thickness of the slab and usually lasts longer than grinding.
Grinding Methods and Tools
Grinding uses heavy machines with diamond-tipped blades or discs. It is useful where tree roots have pushed up a slab or where a short-term fix is needed before future replacement. It is often avoided in visible areas where the exposed aggregate and rough look are considered unattractive.
Slab Leveling Techniques: Mudjacking and Polyjacking
Mudjacking is the older method. It pumps a thick mix of soil, sand, and cement below the slab. It is fairly economical but needs large holes (about 2 inches across) and adds a lot of weight to the soil below. Polyjacking, or polyurethane foam injection, is the newer method.
It uses smaller holes (about 5/8 inch) and a very light foam that expands to fill voids and lift the slab. Polyjacking is faster, more accurate, and the foam does not wash away or compress over time.
Caulking Cracks and Joints
Caulking is a basic maintenance step used to seal non-structural cracks and joints. Unlike hard patch materials, caulk stays flexible and can move as the concrete expands and contracts with temperature changes. This helps keep water out of joints and cracks, so it cannot freeze and widen them.
Good joint sealing also helps prevent “pumping,” where water forces fine soil out from under the slab, causing future settlement. Checking and replacing cracked or brittle joint sealant on a regular schedule is one of the easiest ways to extend the life of concrete.
Sealant Options for Joints and Small Cracks
Common joint sealants include:
- Urethane sealants: Very good adhesion and flexibility, suitable even for moving cracks.
- Silicone sealants: Often used in highway joints and large pavements due to long service life and strong UV resistance.
Shotcrete and Spray-Applied Repair
Shotcrete is concrete that is sprayed at high speed onto a surface. The impact compacts the material, so traditional formwork and vibration are often not needed. This technique works on vertical, curved, and overhead areas where placing regular concrete would be difficult.
There are two main types: dry-mix and wet-mix. In dry-mix shotcrete, dry materials are blown through a hose and water is added at the nozzle, giving the operator control over the mix. In wet-mix shotcrete, ready-mixed concrete is pumped through the hose. Both methods provide strong, well-bonded repairs on existing concrete.
Key Uses for Shotcrete
Shotcrete is often chosen for large structural repairs, such as:
- Bridges and tunnels
- Retaining walls and slope protection
- Dam spillways and water structures
Because it can be placed quickly over wide areas and on complex shapes, it is often more efficient than forming and pouring new concrete in place.
Structural Strengthening: Carbon Fiber and Reinforcement
When a concrete member can no longer carry the loads it was meant to handle, it may need strengthening. Carbon fiber systems have changed how this work is done. They involve bonding very strong carbon fiber strips or sheets to the surface of the concrete with epoxy.
This method increases tensile capacity without adding much size or weight. It is often used on beams that are sagging or walls that are bowing due to soil pressure. It offers a less intrusive option than adding steel plates or thickening existing members.
Advantages of Carbon Fiber Reinforcement
Carbon fiber offers several benefits:
- Very light weight and thin profile
- No corrosion
- Fast installation
- Useful in tight spaces like crawlspaces and mechanical rooms
After installation and painting, the strips are barely visible, keeping the original appearance of the structure.
Ways to Strengthen Aged or Weak Concrete
Other strengthening options include adding rebar and enlarging the cross-section of beams, columns, or slabs with new concrete. For large or underwater repairs, pre-placed aggregate concrete can be used: coarse stone is packed into the form and a grout is pumped in to fill the gaps. This method produces a dense, high-strength repair that works well for bridge piers and marine structures.
Full-Depth or Partial-Depth Concrete Replacement
Sometimes damage is too severe for simple repairs. Full-depth replacement means cutting through the entire slab thickness, removing the old concrete, and pouring new concrete. This gives the most predictable outcome and allows crews to fix the base material and add dowels or load-transfer devices.
Partial-depth replacement applies when the damage is limited to the top third of the slab. It is less disruptive than full replacement but still needs care to help the new concrete bond fully to the old.
Indicators That Require Total Replacement
Replacement is usually needed when:
- Concrete is crumbling or shattered into many small pieces
- Wide map cracking and deep damage are present
- The cost of repeated repairs is higher than a new pour
These signs often mean that the internal structure of the concrete has broken down and surface repairs will not last.
Step-by-Step Replacement Procedure
- Mark and saw-cut the repair area vertically through the full depth of the slab.
- Lift out the old concrete rather than breaking it in place, to protect the base.
- Prepare and compact the base material.
- Drill into adjacent slabs and install dowel bars with epoxy for load transfer.
- Place, consolidate, and finish the new concrete.
- Apply curing compounds and wait until the concrete reaches the required strength before allowing traffic.
Repair Solutions for Specific Concrete Problems
Cracks: Identification and Suitable Repair Choices
Different cracks call for different fixes. Hairline cracks are usually cosmetic and can often be treated with a penetrating sealer. Deeper cracks that pass through the slab may need injection or flexible caulking. It is very important to know if a crack is still moving; if it is, a rigid epoxy repair will likely crack again, and a flexible urethane sealant is usually better.
Spalling and Scaling: Surface Restoration Methods
Spalling happens when the surface peels, flakes, or breaks off, often showing the aggregate or even rebar. Common causes include corroding steel reinforcement and freeze-thaw cycles. Repair usually means removing loose material, cleaning and treating any exposed rebar, and applying repair mortar or a resurfacer. Fixing spalls early helps stop corrosion from spreading deeper.
Discoloration and Surface Stains: Restoration Techniques
Color changes can result from sunlight, poor mixing, curing problems, or chemical spills. While they rarely affect strength, they can look unattractive. Many stains can be reduced with pressure washing and mild acid cleaning. For permanent color problems, using a tinted sealer or a thin micro-topping can restore a more uniform look.
Pitting and Popouts: Addressing Small Surface Defects
Pitting and popouts show up as small craters or bumps where pieces of aggregate have broken loose. They often come from poor-quality aggregate or finishing issues. Filling these spots with a fine patching material can smooth the surface. To avoid them in future work, use clean, durable aggregates and follow good curing practices.
Efflorescence: Removing White Residue
Efflorescence is the white, powder-like residue often seen on concrete. It happens when water carries soluble salts to the surface and they dry there. While usually harmless, it signals ongoing moisture movement. It can be brushed off with water and a stiff brush, or treated with special cleaners. Sealing the surface after cleaning helps reduce the chance of it coming back.
Joint Damage: Repairing Expansion and Control Joints
Joints are natural weak points in pavements and slabs. When their edges start to crumble, it can damage vehicle tires and allow more water to enter. Joint repairs often involve cutting away damaged edges and adding a high-strength, flexible joint nosing material, then resealing the joint with silicone or urethane sealant.
Drainage and Water Pooling: Leveling and Sealing
Standing water shortens the life of concrete. If a slab has settled and created low spots (birdbaths), leveling the concrete is often the best solution to restore proper slope. For very shallow dips, a thin, self-leveling overlay may be enough. Directing water away from foundations and concrete surfaces is one of the main factors in keeping concrete in good shape over time.
Crumbling Edges and Corners: Edge Repair Solutions
Edges and corners often fail from impact, traffic, or water damage. Because these spots usually carry loads, a simple skim coat often will not last. Long-lasting edge repair usually involves cutting back to solid concrete and using high-strength patching materials, often with dowels or pins tying the patch into the main slab.
Frequently Asked Questions about Concrete Repair Methods
How Long Does Concrete Repair Take to Cure?
Standard concrete usually needs about 28 days to reach full design strength, but repair products often use faster-setting mixes. Some areas can handle foot traffic in 1-4 hours. For driveways and roads, repairs are usually opened to vehicles once the concrete reaches around 2,000 psi, which can take 6-24 hours when high-early-strength mixes are used.
Weather has a big effect on curing time. In cold conditions, thermal blankets or heaters may be needed to keep concrete warm enough to gain strength. In hot, dry weather, the surface must be kept moist to prevent rapid drying, weak surface layers, and shrinkage cracks.
Which Tools and Materials Are Needed for Repairs?
Basic DIY tools often include:
- Cold chisel and heavy hammer
- Wire brush
- Steel trowel
Professional work may require:
- Diamond-blade saws and grinders
- High-pressure injection pumps
- Pneumatic drills
- Vibratory screeds and consolidation tools
Materials can range from pre-mixed repair mortars and hydraulic cements to two-part epoxies and special grouts or fillers for leveling.
Should You Hire a Professional or DIY?
Small, cosmetic repairs-like tiny chips or hairline surface cracks-are often suitable for DIY kits. Structural damage, sunken slabs, wide cracks, or repairs that need injection equipment should be left to experienced contractors. These jobs require knowledge of loads, structural behavior, and material performance that most homeowners do not have.
Can You Paint or Coat Repaired Concrete?
Yes, but the repair must be fully cured first. If paint or coatings are applied too early, trapped moisture can cause peeling and bubbles. Many professionals suggest waiting at least 28 days for standard cement-based repairs. Before coating, clean the surface and, if required, lightly etch it so that paint or epoxy can bond properly.
Ways to Prevent Future Concrete Damage
Regular care is the best defense against future problems. Helpful steps include:
- Sealing concrete every 3-5 years with a good penetrating sealer
- Keeping cracks and joints caulked to stop water from entering
- Making sure gutters, downspouts, and grading carry water away from slabs and foundations
These simple habits reduce the chances of settlement, scaling, and freeze-thaw damage.
Key Takeaways for Effective Concrete Repair
Effective concrete repair depends on good planning and record-keeping, not just the repair work itself. Keeping a log of repairs-including date, materials, conditions, and methods-helps owners see patterns and repeated issues. This kind of record can reveal hidden problems, such as drainage or soil issues, that keep causing new damage.
Matching repair materials to the original concrete is also very important. The new material should have similar stiffness and thermal movement. If the repair mix is too stiff or expands and contracts at a different rate, it can separate from the old concrete or cause new cracking nearby.
Working with a supplier who focuses on repair products can provide the technical data needed to pick materials that will give a long-lasting, durable fix, rather than a short-term patch.